Deployment of React, Node and Loopback 4 portal on Linux Server

By Sumit Ranjan Shrivastava
Sr. Technical Manager
This article will demonstrate how to deploy an application built with React and Loopback for the frontend and backend, respectively. I will guide you through a step-by-step deployment process for both the frontend and backend, using Google servers. Two servers will be utilized for the deployment of the frontend and backend respectively. Additionally, these applications will be deployed directly from a GitHub account.
To begin the deployment process, we will need servers for both the frontend and backend. For this deployment, I have opted to use VMs on the Google Cloud Platform, but you can use servers from other providers as well, as the steps will remain the same.
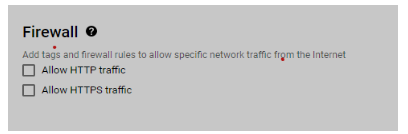
If you do not already have hosting, or if you are new to the Google Cloud Platform, follow the steps below to create VMs on Google:
If you have not yet installed node on your development machine, please install it. However, if you have already developed an application, you can skip this step.
Please install node with the latest version 14.0.0+ and npm >= 5.6 on your machine. After installation, you can run the command provided below on any terminal, such as VS code, CMD, or Git Bash:
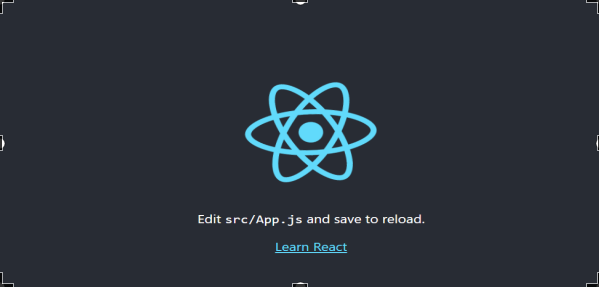
$ npx create-react-app my-app
Your sample application is ready for deployment.
					$ cd my-app
$ npm start
Your sample application is ready for deployment.
If your API has already been developed in Node, you can skip this step. However, since I am creating a Loopback 4 sample application that we will use in deployment, please follow the instructions provided.
$ npm i -g @loopback/cli
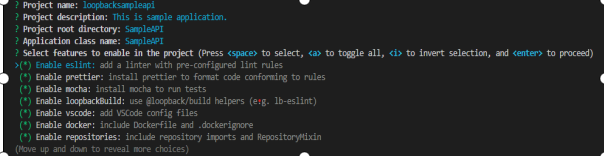
2. You can use the CLI tool to initiate a new project. This will create the project structure, set up the TypeScript compiler, and install the required dependencies. To generate a new project, simply run the CLI and follow the prompts.
$ lb4 app
It will ask project name and other details as mentioned below provide the input.
					$ cd sampleapi
$ npm start
To generate the personal token click on Profile > Settings > Developer Settings
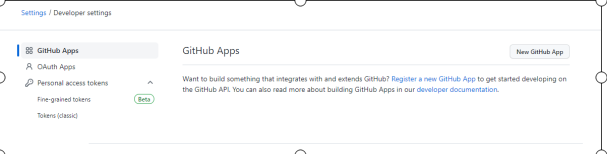
3. Click on personal access token and provide all required permissions and copy the code. Keep it safe will require this later.
Now that you have completed all the prerequisites, we can begin the deployment process. Please connect to your server and follow the step-by-step instructions.
					$ sudo apt update
$ sudo apt upgrade
The above command updates and upgrades to the latest build and then installs NGINX.
To validate our installation and the default NGINX configuration, please execute the command provided below:
$ sudo nginx -t
To install Node & NPM run below mentioned command
					$ sudo apt install nodejs
$ sudo apt install npm
To install Git run below mentioned command
$ sudo apt-get install git
To configure the React app, we will need to create a new directory and provide all the necessary permissions, including read, write, and execute.
Run below mentioned command one by one to create and provide require permissions.
					$ sudo mkdir /var/www/my-app
$ sudo chmod 755 -R /var/www/my-app
$ sudo chown -R sumit_shrivastava:www-data /var/www/my-app
Create sites configuration
sudo nano /etc/nginx/sites-available/my-app
Then add below mentioned configuration.
					server {
  listen 80;
  location / {
        root /var/www/my-app/build;
        index  index.html index.htm;
        proxy_http_version 1.1;
        proxy_set_header Upgrade $http_upgrade;
        proxy_set_header Connection 'upgrade';
        proxy_set_header Host $host;
        proxy_cache_bypass $http_upgrade;
        try_files $uri $uri/ /index.html;
  }
}
We need to unlink the default site and create a new link, execute below mentioned command.
					$ sudo unlink /etc/nginx/sites-enabled/default
$ sudo ln -s /etc/nginx/sites-available/my-app  /etc/nginx/sites-enabled/my-app
Now we need to validate our configuration and restart the Nginx server.
					$ sudo nginx –t
$ sudo systemctl restart nginx
The site configuration is complete. Now, we need to clone the files from the Git repository and create a build. Please execute the command provided below to clone the repository:
$ git clone https://github.com/<your repository url>
When you run this command, it will prompt you to provide your Git username and personal access token for authentication.
Once you have entered these details, please navigate to the root folder and install all the required packages. Then, create the build.
					$ npm install
$ npm run build
The React front-end application is now up and running. You can access it by browsing the public IP address of your server or your domain name.
We will now create a deploy batch file that will automatically pull the latest code from the repository and deploy the build. To do this, please execute the command below to create a deploy.sh file and paste the deployment script:
$ nano deploy.sh
Deployment script
					echo "Switching to branch master"
git checkout  master
 git config pull.ff only
git pull
echo "Building app... "
npm run build
echo "Application is updated "
Write this command in your root directory to make deploy.sh executable
$ sudo chmod u+x deploy.sh
To update, build, and run your React app, please navigate to the root directory of your app and execute the deploy.sh script using the following command:
$ ./deploy.sh
This will automatically update the app, install any new dependencies, build the app, and start the server.
First, follow all the installation steps mentioned above, and then install pm2 by running the following command:
$ sudo npm i -g pm2
However, if you are configuring both the frontend and backend on the same server, you can skip the other installation steps and directly install pm2 using the command provided above.
To create and assign the necessary permissions, run the commands below in sequence.
					$ sudo mkdir /var/www/api
$ sudo chmod 755 -R /var/www/api
$ sudo chown -R sumit_shrivastava:www-data /var/www/api
If you are configuring both the frontend and backend on the same server, you can skip creating the site configuration.
$ sudo nano /etc/nginx/sites-available/api
Then add below mentioned configuration.
					server {
  listen 80;
  location / {
  proxy_pass http://localhost:3000;
  proxy_http_version 1.1;
  proxy_set_header Upgrade $http_upgrade;
  proxy_set_header Connection 'upgrade';
  proxy_set_header Host $host;
  proxy_cache_bypass $http_upgrade;
}
Location file for common server of frontend and backend.
					server {
  listen 80;
  location / {
        root /var/www/my-app/build;
        index  index.html index.htm;
        proxy_http_version 1.1;
        proxy_set_header Upgrade $http_upgrade;
        proxy_set_header Connection 'upgrade';
        proxy_set_header Host $host;
        proxy_cache_bypass $http_upgrade;
        try_files $uri $uri/ /index.html;
  }
location /api {
        proxy_pass http://localhost:3000;
        proxy_http_version 1.1;
        proxy_set_header Upgrade $http_upgrade;
        proxy_set_header Connection 'upgrade';
        proxy_set_header Host $host;
        proxy_cache_bypass $http_upgrade;
  }
}
Execute the following command to unlink the default site and create a new link:
					$ sudo unlink /etc/nginx/sites-enabled/default
$ sudo ln -s /etc/nginx/sites-available/my-app  /etc/nginx/sites-enabled/api
Next, we need to verify the configuration we just created and restart the Nginx server.
					$ sudo nginx –t
$ sudo systemctl restart nginx
Once the site configuration is completed, the next step is to clone the required files from the Git repository and create a build. Use the following command to create a clone. If your frontend and
backend are from a common repository, you can skip this step. Then, navigate to the root folder of the app and install all the required packages and create a build using the command mentioned earlier.
$ git clone https://github.com/<your repository url>
Please enter your Git username when prompted, and provide your personal token as the password to access the repository.
As we proceed, there will be different approaches for installing the Node API and the Loopback 4 API. You can find the instructions for each installation method below.
To install the dependencies and create a build, navigate to the root directory of your Node API and execute the following commands.
$ npm install
Create your environment (.env) file and past your environment specific variables.
$ sudo .env
You may execute the command provided below to run your API, but keep in mind that the API will stop working once you close the SSH session. Therefore, it is recommended to use this command for validation purposes only.
$ node index.js
To ensure that your API runs continuously, even after closing the SSH connection, it is recommended to configure it using pm2. To create a pm2 instance, execute the following command:
					$ pm2 start --name Api index.js
$ pm2 startup
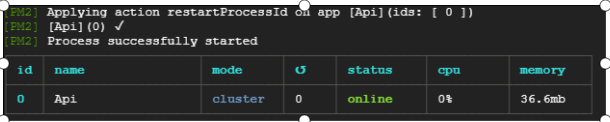
Great! Your Node application is now running and accessible through the public IP or URL. If your React and Node APIs are both on the same server, make sure to navigate to /api.
You need to navigate to the root directory of your app and execute the following commands to install all the required packages and create a build.
$ npm install
Create a file called .env and enter the environment-specific variables required for your application.
$ sudo .env
Running the API with the command below is not recommended for production use as the API will stop working once the SSH session is closed. This is only recommended for validation purposes.
npm start
For persistent running of the API, it is recommended to set up a pm2 instance. This will ensure that the API continues to run even after closing the SSH connection. To create a pm2 instance, execute the following command:
					$ pm2 Setup
$ pm2 init
After executing the previous command, an “ecosystem.config.js” file will be generated in the root directory. You need to modify this file to match the Loopback requirements. Delete the existing script and add the following script to it.
					module.exports = {
     apps: [
       {
         name: 'API',
         script: 'dist/index.js',
         instances: 1,
         autorestart: true,
         watch: false,
         max_memory_restart: '1G',
         env: {
           NODE_ENV: 'development',
         },
         env_production: {
           NODE_ENV: 'production',
         },
       },
     ],
To add pm2 as a dependency to your project, run the command provided below. This will ensure that pm2 is installed and included in your project’s dependencies
$ npm install pm2 --save
The next step involves modifying the start script in the package.json file and adding a stop script as well. Here’s the modified version of the script that you should use.
					"scripts": {
        "start": "pm2 start ecosystem.config.js --env production",
        "stop": "pm2 stop ecosystem.config.js --env production",
      }
After completing all the necessary configurations, you can start the app, which will create a pm2 instance.
$ npm run start:prod
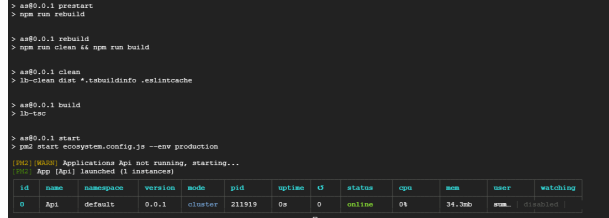
Your API is now operational and can be accessed via the public IP or URL. In case React and the API are on the same server, don’t forget to navigate to ‘/api’.
In conclusion, deploying a full-stack application with React, Node, and Loopback can seem daunting at first, but with the right tools and steps, it can be a smooth process. By following the guidelines presented in this article, you should be able to successfully deploy your application on a server, ensuring it runs efficiently and without interruptions. Remember to keep your dependencies and configurations updated and secure, and feel free to explore further optimizations to improve your application’s performance. Happy coding!”
2023 © Credex Technology. All other trademarks, brands, and names mentioned herein are the property of their respective owners. All rights reserved.
![]() Offices
Offices
Wilmington, DE | Palo Alto, CA | San Ramon, CA | Noida, IN
© 2024 Credex Technology. All Rights Reserved.
Social Links


| Cookie | Duration | Description |
|---|---|---|
| cookielawinfo-checkbox-analytics | 11 months | This cookie is set by GDPR Cookie Consent plugin. The cookie is used to store the user consent for the cookies in the category "Analytics". |
| cookielawinfo-checkbox-functional | 11 months | The cookie is set by GDPR cookie consent to record the user consent for the cookies in the category "Functional". |
| cookielawinfo-checkbox-necessary | 11 months | This cookie is set by GDPR Cookie Consent plugin. The cookies is used to store the user consent for the cookies in the category "Necessary". |
| cookielawinfo-checkbox-others | 11 months | This cookie is set by GDPR Cookie Consent plugin. The cookie is used to store the user consent for the cookies in the category "Other. |
| cookielawinfo-checkbox-performance | 11 months | This cookie is set by GDPR Cookie Consent plugin. The cookie is used to store the user consent for the cookies in the category "Performance". |
| viewed_cookie_policy | 11 months | The cookie is set by the GDPR Cookie Consent plugin and is used to store whether or not user has consented to the use of cookies. It does not store any personal data. |